This is default featured slide 1 title

Go to Blogger edit html and find these sentences.Now replace these sentences with your own descriptions.This theme is Bloggerized by Lasantha Bandara - Premiumbloggertemplates.com.

This is default featured slide 2 title

Go to Blogger edit html and find these sentences.Now replace these sentences with your own descriptions.This theme is Bloggerized by Lasantha Bandara - Premiumbloggertemplates.com.

This is default featured slide 3 title

Go to Blogger edit html and find these sentences.Now replace these sentences with your own descriptions.This theme is Bloggerized by Lasantha Bandara - Premiumbloggertemplates.com.

This is default featured slide 4 title

Go to Blogger edit html and find these sentences.Now replace these sentences with your own descriptions.This theme is Bloggerized by Lasantha Bandara - Premiumbloggertemplates.com.

This is default featured slide 5 title

Go to Blogger edit html and find these sentences.Now replace these sentences with your own descriptions.This theme is Bloggerized by Lasantha Bandara - Premiumbloggertemplates.com.

Sunday, 11 May 2014

How To Access Your Folders From Your Taskbar


This is an easy way to get to the folders on your system without having to open a Windows Explorer Window every time you want to access files. I find it very useful to have this feature as it allows me to access my Folders and Drives immediately and saves me a lot of time.

This works in Windows XP:

1. Right Click an empty spot on your Taskbar (Between your Start Button and your System Tray).
2. Click Toolbars.
3. Click New Toolbar.
4. A Small Window will Open that allows you to pick the folder you wish to make a Toolbar. If you want to access your Desktop Without having to minimize all your windows. Just Pick Desktop. If you want to access ONLY your My Documents Folder, Select that. Any folder will work for this.
5. Click OK.
The New Tool bar will appear at the bottom of your screen next to your System Tray.

If you find this to be not useful, Repeat Steps 1 and 2 and then check click the Toolbar you created that has a check mark next to it. And it will disappear.

Create a Personal Screensaver in Win XP


This isnt a tweak, but a great little feature! For a great way to put your digital photos to work, try creating a slide show presentation for use as a screen saver. Here's how:


1. Right-click an empty spot on your desktop and then click Properties.
2. Click the Screen Saver tab.
3. In the Screen saver list, click My Pictures Slideshow.
4. Click Settings to make any adjustments, such as how often the pictures should change, what size they should be, and whether you'll use transition effects between pictures, and then click OK.

Now your screen saver is a random display of the pictures taken from your My Pictures folder.

Windows 8 Boot Issues? Try Fixing the Master Boot Record (MBR) or Boot Configuration Data (BCD)


Windows 8 received a decent amount of enhancements on the desktop side that I tend to appreciate versus running
Windows 7, even if that means I get Metro standing in the middle here and there occasionally. One such area of improvement is notification management and how it handles updates and system restarts. Running the final version of the OS for a few months now, it’s been a painless affair until this past weekend.
I shut down my desktop PC with the purpose of connecting new hardware and on the way out I was prompted to “update and shutdown”. Sure, why not. I went on to install a secondary SSD for maintenance purposes and apparently that was enough for my system to refuse booting right after. I tried to backtrack to no avail.
"Reboot and select proper boot device"
I bet you have no love for the message, neither do I.
Because I had disconnected a few devices, it took me a while to narrow things down to my boot SSD, and for a second I even thought the SSD had gone forever kaput. After booting with a different drive and noting I could read all my data on the drive in question, I took a deep breath and started to troubleshoot the boot record. Once you settle on the idea that it’s not a hardware problem and you are unable to boot up, your best bet is to try to fix the MBR (Master Boot Record).
With a long history of dual booting different versions of Windows over the years, finding a corrupt MBR, boot sector, or Boot Configuration Data (BCD) is nothing new, but it took me longer than usual to come to a solution. Here are a few things you can try and hopefully get back to full speed in no time.
First of all, you will need a bootable disc or pen drive. Here’s a quick guide to accomplish that if you don’t already have one handy. Although it's not a requirement, to be on the safe side it's recommended at this point that you disconnect other storage devices from your PC and leave only the SSD/HDD that you are troubleshooting.
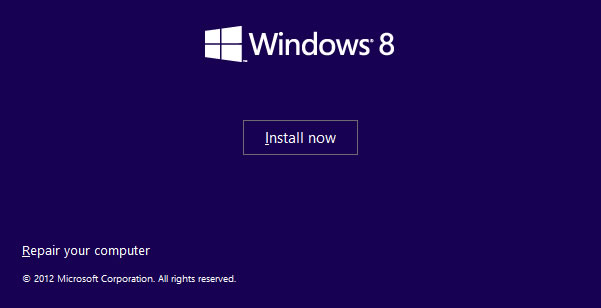
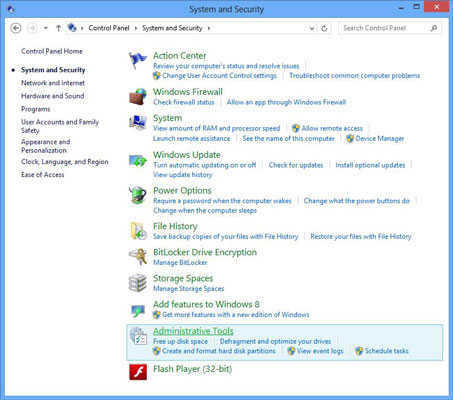
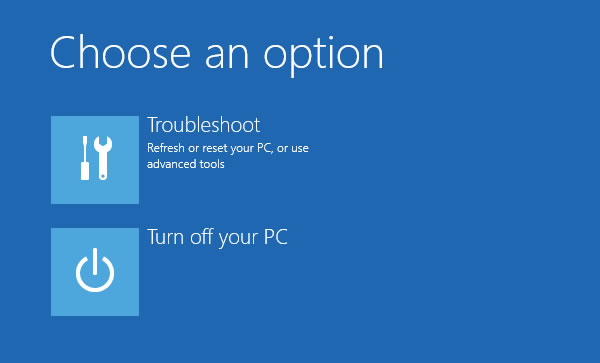
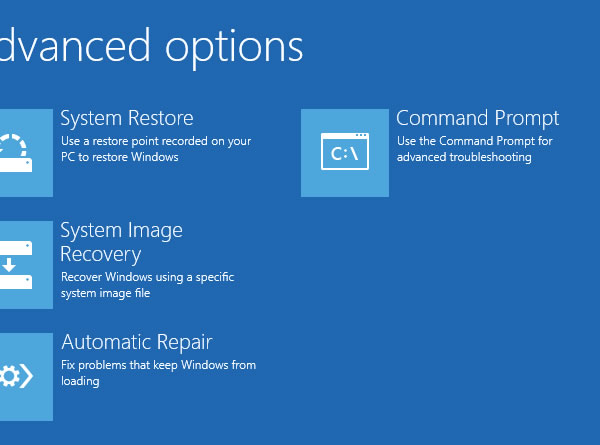
Booting into the Windows setup, select “Repair your computer” in the bottom part of the window, then “Troubleshoot” and “Advanced options”. Here I was given a good reminder of another cool Windows 8 feature. If you have a restore point created you can go back to that working copy of the OS without losing your data. Well, I didn’t have any.
So the first thing you will want to try is the Automatic Repair.
If that fixes your boot problem, you had it easy and go on to create a restore point for another time you are out of luck. If Windows is unable to fix your issue, read on.
Go back to the Advanced options and choose the Command Prompt. Going for the next easiest way to fix the problem, enter the following four commands into the prompt:
bootrec /fixmbr
bootrec /fixboot
bootrec /scanos
bootrec /rebuildbcd
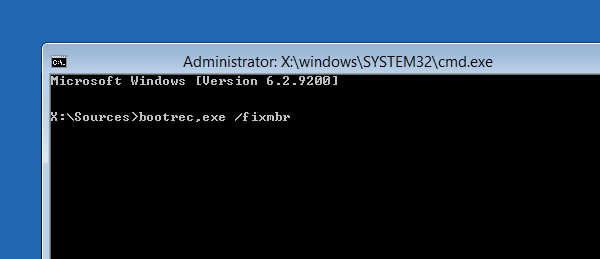
After receiving a success confirmation. Close the CMD window and restart your PC.
If you are booted into Windows, excellent! If not, let’s try one last thing. Follow the previous steps until you have landed into the Command Prompt.
Enter the “bcdedit” command. A lists of items will appear under Windows Boot Manager and under Windows Boot Loader. Look for the following items:
  • Under Windows Boot Manager, the Device item should be set to unknown.
  • Under Windows Boot Loader, the Device and os device items should be set to unknown.
Run the following three commands to correct the settings:
bcdedit /set {default} device partition=c:
bcdedit /set {default} osdevice partition=c:
bcdedit /set {bootmgr} device partition=c:
One last thing to try (though in theory, it's the repeating what we’ve done before) browse to the folder X:SourcesRecovery and then enter “StartRep.exe” which executes another automated startup repair utility.

How to Change the Start Screen Background in Windows 8


Windows 8’s new Start screen has been hotly debated since theoperating system launched in preview mode earlier this year. Acknowledged by some as a bold step into the tablet market, and criticized by many others who prefer the familiar desktop experience, the new 'Modern UI Style' home is here to stay. But beyond not offering a way to bypass this screen (not without the help of third-party utilities), surprisingly Microsoft is also limiting your options when it comes to customizing the Start screen's appearance. You can choose from a couple color schemes and 10 stock background images, but that's about it.
We've seen some workarounds before but they require firing up the HEX editor to modify system files, and you are still limited to 256-color background images in a handful of specific sizes. That’s more work than most people are probably willing to bother with and as you can imagine the results are not quite optimal.
Enter Decor8. Stardock’s latest Windows 8 customization app removes this limitation by giving users the ability to pick any picture they want, regardless of size or color range, as the Start screen background.
Change Windows 8 Start screen background
The program is pretty straightforward to use. Upon launching Decor8, you’ll be presented with a set of background images to choose from, including the start screen and desktop background images thatWindows 8 ships with and also a set of wallpapers that Stardock ships with the app. You get the usual fill, fit, tile and center options available in the classic desktop, and the program will automatically create a color scheme to match each of your background images -- or you can manually customize the color scheme if you’re so inclined.
You can add folders to the program to use your own photos and images as background. There’s also the option to select multiple background images by holding down the Ctrl key, and have them rotate on a set time interval, as well as the option to fade background images against the start screen color for a subtle effect.
Change Windows 8 Start screen background
Sadly, Decor8 is not free. Stardock offers a free 30-day trial but otherwise asks a modest $4.99 for the app. It’s a little unnerving to pay for such basic functionality but if you wish to customize the Windows 8 Start screen beyond what Microsoft offers this is the easiest-to-usetool we’ve found. It does one thing and it does it well.

Saturday, 10 May 2014

Free Up Space on Your Hard Drive with Windows 8


1

Right-click your screen's bottom-left corner and choose Control Panel.

From the desktop, slide your finger in from the screen's right edge, tap the Settings icon, and tap the Control Panel link in the screen's top-right corner.
2

Click the Control Panel's System and Security category. Then, in the Administrative Tools category (near the bottom), click the Free Up Disk Space link.

If your PC has more than one disk drive, Windows 8 asks which drive to clean up. The Disk Cleanup Drive Selection window appears.
3

Leave the choice set to (C:) and click OK.

The Disk Cleanup program calculates how much disk space you can save and presents the Disk Cleanup dialog box. (The amount of disk space you can save is shown at the top of the dialog box.)
4

Select the check boxes for all the items and then click OK.

As you select a check box, the Description section explains what's being deleted. When you click the OK button, Windows asks if you're sure you want to delete the files.
If you spot a Clean Up System Files button, click it, too. It deletes detritus created by your PC, not you.
5

Click the Delete Files button to erase the unneeded files.

Windows 8 proceeds to empty your Recycle Bin, destroy leftovers from old websites, and remove other hard drive clutter.

Windows 8 Product Keys


Windows 8.1 serial key : ultimate edition

NTTX3-RV7VB-T7X7F-WQYYY-9Y92F

Windows 8 OS key : Professional edition

XKY4K-2NRWR-8F6P2-448RF-CRYQH

Windows 8 product key : Release preview

TK8TP-9JN6P-7X7WW-RFFTV-B7QPF

Windows 8 product number : Consumer preview

DNJXJ-7XBW8-2378T-X22TX-BKG7J

Windows 8 OS key : Developer’s preview

6RH4V-HNTWC-JQKG8-RFR3R-36498

Windows 8 product key : Developer’s version

Y8N3-H7MMW-C76VJ-YD3XV-MBDKV

6RH4V-HNTWC-JQKG8-RFR3R-36498

4Y8N3-H7MMW-C76VJ-YD3XV-MBDKV

MBFBV-W3DP2-2MVKN-PJCQD-KKTF7

28VNV-HF42G-K2WM9-JXRJQ-2WBQW

NF32V-Q9P3W-7DR7Y-JGWRW-JFCK8

Windows 8 serial key : English

DNJXJ-7XBW8-2378T-X22TX-BKG7J

Windows 8 software key : Chinese

DNJXJ-7XBW8-2378T-X22TX-BKG7J

Windows 8 serial number : German

DNJXJ-7XBW8-2378T-X22TX-BKG7J

Windows 8 unique serial number : French

DNJXJ-7XBW8-2378T-X22TX-BKG7J

Windows 8 product key : Japanese

DNJXJ-7XBW8-2378T-X22TX-BKG7J

Window 8 Serial Keys 100 % Working

2GVN8-TV3C2-K3YM7-MMRVM-BBFDH

967N4-R7KXM-CJKJB-BHGCW-CPKT7

84NRV-6CJR6-DBDXH-FYTBF-4X49V

RRYGR-8JNBY-V2RJ9-TJP4P-749T7

ND8P2-BD2PB-DD8HM-2926R-CRYQH

XWCHQ-CDMYC-9WN2C-BWWTV-YY2KV

BDDNV-BQ27P-9P9JJ-BQJ96-KTJXV

KNTGM-BGJCJ-BPH3X-XX8V4-K4PKV

F8X33-CNV3F-RH7MY-C73YT-XP73H

967N4-R7KXM-CJKJB-BHGCW-CPKT7

HNRGD-JP8FC-6F6CY-2XHYY-RCWXV

84NRV-6CJR6-DBDXH-FYTBF-4X49V

BDDNV-BQ27P-9P9JJ-BQJ96-KTJXV

CDQND-9X68R-RRFYH-8G28W-82KT7

DWV49-3GN3Q-4XMT7-QR9FQ-KKT67

F2M4V-KFNB7-9VVTW-MVRBQ-BG667

F8X33-CNV3F-RH7MY-C73YT-XP73H

GPTCC-XN297-PVGY7-J8FQY-JK49V

HV3TW-MMNBG-X99YX-XV8TJ-2GV3H

J6FW2-HQNPJ-HBB6H-K9VTY-2PKT7

KQWNF-XPMXP-HDK3M-GBV69-Y7RDH

MMRNH-BMB4F-87JR9-D72RY-MY2KV

N4WY8-DVW92-GM8WF-CG872-HH3G7

ND8P2-BD2PB-DD8HM-2926R-CRYQH

RRYGR-8JNBY-V2RJ9-TJP4P-749T7

VHNT7-CPRFX-7FRVJ-T8GVM-8FDG7

84NRV-6CJR6-DBDXH-FYTBF-4X49V

BDDNV-BQ27P-9P9JJ-BQJ96-KTJXV

967N4-R7KXM-CJKJB-BHGCW-CPKT7

KQWNF-XPMXP-HDK3M-GBV69-Y7RDH

F2M4V-KFNB7-9VVTW-MVRBQ-BG667

CR8NP-K37C3-MPD6Q-MBDDY-8FDG7

39DQ2-N4FYQ-GCY6F-JX8QR-TVF9V

VHNT7-CPRFX-7FRVJ-T8GVM-8FDG7

GPTCC-XN297-PVGY7-J8FQY-JK49V

HV3TW-MMNBG-X99YX-XV8TJ-2GV3H

CDQND-9X68R-RRFYH-8G28W-82KT7

7HBX7-N6WK2-PF9HY-QVD2M-JK49V

D32KW-GNPBK-CV3TW-6TB2W-K2BQH

NBWPK-K86W9-27TX3-BQ7RB-KD4DH

2NF99-CQRYR-G6PQ9-WYGJ7-8HRDH

F7BDM-KTNRW-7CYQP-V98KC-W2KT7

4JKWV-MNJCY-8MW3Q-VJYGP-DC73H

KQWNF-XPMXP-HDK3M-GBV69-Y7RDH

MMRNH-BMB4F-87JR9-D72RY-MY2KV

N4WY8-DVW92-GM8WF-CG872-HH3G7

ND8P2-BD2PB-DD8HM-2926R-CRYQH

RRYGR-8JNBY-V2RJ9-TJP4P-749T7

FFX8D-N3WMV-GM6RF-9YRCJ-82KT7

2CMGK-NMW4P-B846H-YXR6P-27F9V

D2GBF-NGBW4-QQRGG-W38YB-BBFDH

NTVHT-YF2M4-J9FJG-BJD66-YG667

GBJJV-YNF4T-R6222-KDBXF-CRYQH

4NMMK-QJH7K-F38H2-FQJ24-2J8XV

84NRV-6CJR6-DBDXH-FYTBF-4X49V

3NHJ7-3WWQK-4RFTH-8FHJY-PRYQH

988NM-XKXT9-7YFWH-H2Q3Q-C34DH

TGXN4-BPPYC-TJYMH-3WXFK-4JMQH

N9C46-MKKKR-2TTT8-FJCJP-4RDG7

Q4NBQ-3DRJD-777XK-MJHDC-749T7

2VTNH-323J4-BWP98-TX9JR-FCWXV

D7KN2-CBVPG-BC7YC-9JDVJ-YPWXV

2GVN8-TV3C2-K3YM7-MMRVM-BBFDH

4NMMK-QJH7K-F38H2-FQJ24-2J8XV

76NDP-PD4JT-6Q4JV-HCDKT-P7F9V

7HBX7-N6WK2-PF9HY-QVD2M-JK49V